How To Create a Dropshipping store with WordPress in 2024
Dropshipping business has become so popular over the years because of its easy setup and small capital requirements.
Gone are the days when setting up an e-commerce store requires that you manage shipping logistics and product inventories.
With the Dropshipping business, you can create an e-commerce store without taking the responsibility of delivering an already purchased goods from your store.
So in this tutorial, I will be teaching you how to create a Dropshipping store with WordPress. If you stay till the end of the article, I will share with you some tips on how to find the winning product to sell in your store.
For the benefit of this post, I will break down the whole process into different steps for easy assimilation.
Let’s get started…
What Is Dropshipping?
Dropshipping is a retail fulfilment method where an online store doesn’t keep the product in stock; Instead, when a customer purchases a product from the store, the store owner will then purchases the item from the vendor and has it shipped directly to the customer using the address provided by the customer.
The advantage of the Dropshipping model over traditional e-commerce is that you don’t need to have the product in stock. You don’t have any business with shipping the product to the customer.
Once a customer purchases in your store, you forward the order details to the primary vendor of the product, possibly the manufacturer who fulfils it.
Apart from creating a Dropshipping store with WordPress, there are other ways you can get a standard Dropshipping website which include:
- By using software builders like Shopify and Oberlo to create your Dropshipping website.
- By ordering an already made Dropshipping store from Alidropship.
- And finally, create your Dropshipping website with WordPress and Alidropship Plugin + WooComerce Plugin
Setting up and running a Dropshipping business has become rampant these days due to its smooth and low operating cost.
Creating A Dropshipping Website With WordPress
Now that we are set to create a dropshipping website with WordPress, I will like you to know that there are two methods you can use to achieve the same goal, one is by using.
- Alidropship Plugin for WordPress
- WooCommerce Plugin for WordPress.
To get started with WordPress, you’ll need the following items:
- A domain name (Your unique store address, e.g., mackiestdon.com)
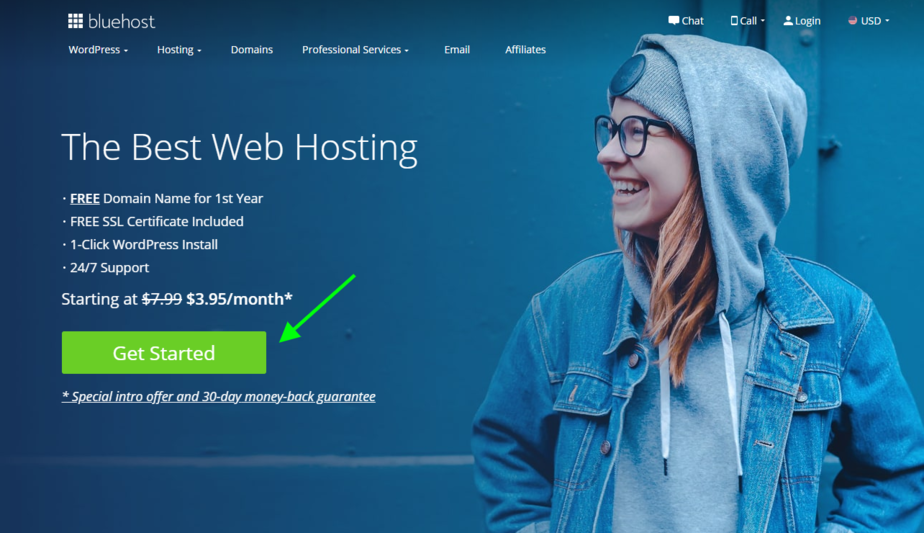
- Web hosting account (This is where your website’s files will be stored)
- SSL certificate (You’ll need it to accept online payments)
Usually, a domain name costs $14.99 / year, an SSL Certificate $69.99 / year, and web hosting starts from $7.99/month.
As you can see, the price is not pocket friendly any longer. But don’t worry, I have a surprise for you.
For that, I’m going to recommend getting your domain name, SSL certificate, and web hosting account with BlueHost. You will get all the above-listed requirements at a whooping price of $2.75 per month.
That Sounds Amazing, right?
Bluehost is one of the most popular web hosts today owing to its reliability, uptime, performance, affordability, and brilliant features that help in your website’s growth.
Moreover, it is easy to use and beginner-friendly, which again is an excellent trait in a web hosting service. You don’t have to be a tech guru to implement Bluehost web hosting in your business strategy successfully.
Here are my reasons for choosing Bluehost:
- Free Domain name
- Free SSL certificate
- 99.9% Server Uptime
- Beginners-Friendly.
- 24/7/365 Customer Support.
- 30 days Money-Back Guarantee.
So to get started with purchasing the domain name and web hosting plan, we have to head straight to Bluehost.com. From the homepage, click on “Get Started.”
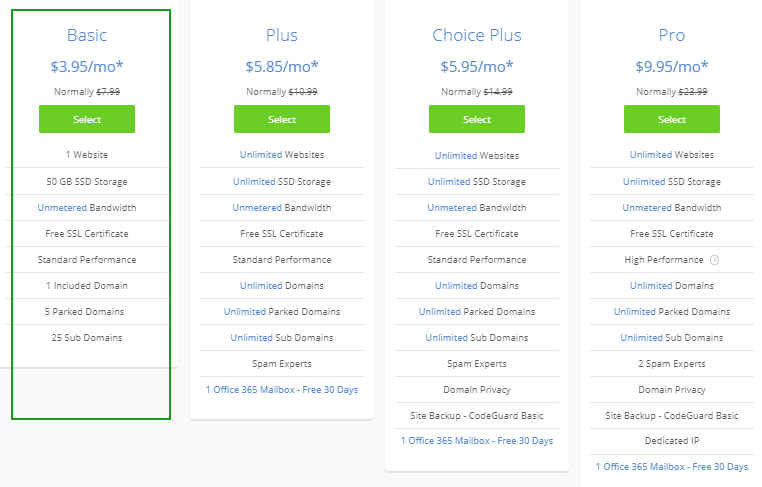
The next step is to choose a hosting plan.
Putting into consideration the kind of website you are about to set up, the basic plan is very much okay for you when getting started. If there is a need for a higher project in the future, you can still upgrade, but for now, I recommend the basic plan.
After choosing a hosting plan, the next step is to select a domain name for your online store.
You will be presented with two boxes in front of you; the first box demands you to choose a new domain which is free while the second one allows you to add an already existing domain you have with another domain name registrar.
I recommend you choose a new domain name which is at no additional cost to you, free kinds of stuff always feel good.
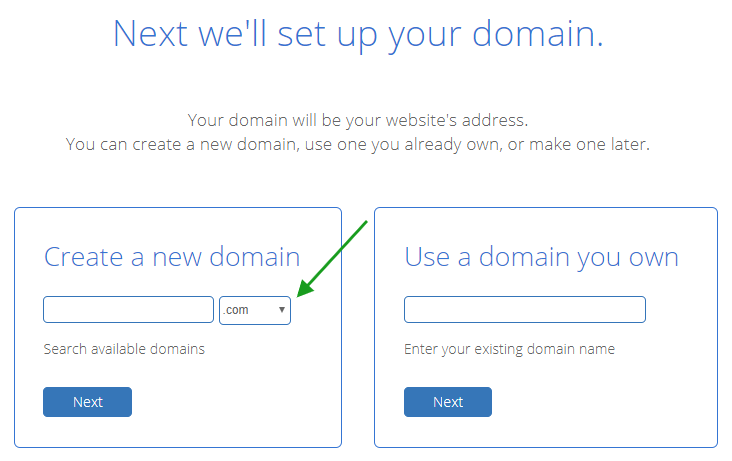
The small box with a drop-down in the picture above helps you to choose the domain name extension of your choice, also knowns as TLDs (Top Level Domain). You can choose either from .com, org, net and so on…

According to recent research by Growthbadger, it is confirmed that domain names with.COM extension tends to do well more than any other TLDs.
So I recommend you choose .com for better and quicker results.
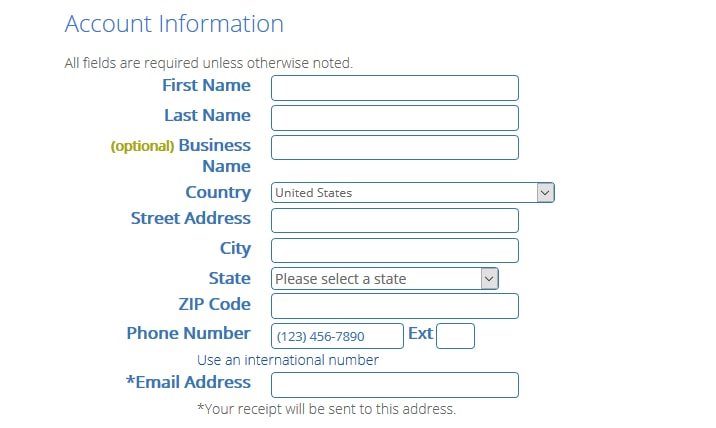
Once you are done with these steps above, then you will be required to enter your details to create an account with BlueHost.
Fill in the form with your correct details.
The next step in the process is your hosting package information.
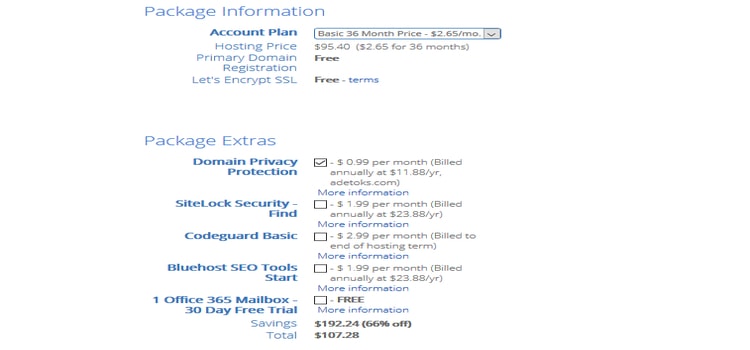
Bluehost hosting plan ranges from 24 months, 36 months, and 60 months subscription, you can choose from any of them depending on your budget.
It is advisable to uncheck all the boxes to avoid additional charges.
The next step is to fill in your payment details. You can pay with any of the payment methods available on the site. Check the terms and conditions box and submit.
After clicking the submit button, you will be required to create a password for your hosting control panel account.
Ensure you create a secure password, copy the password and your hosting detail and keep it where you can access it quickly because it will be required whenever you want to contact the Bluehost support team for assistance.
Bluehost will automatically install WordPress for you, so you don’t need to worry about that.
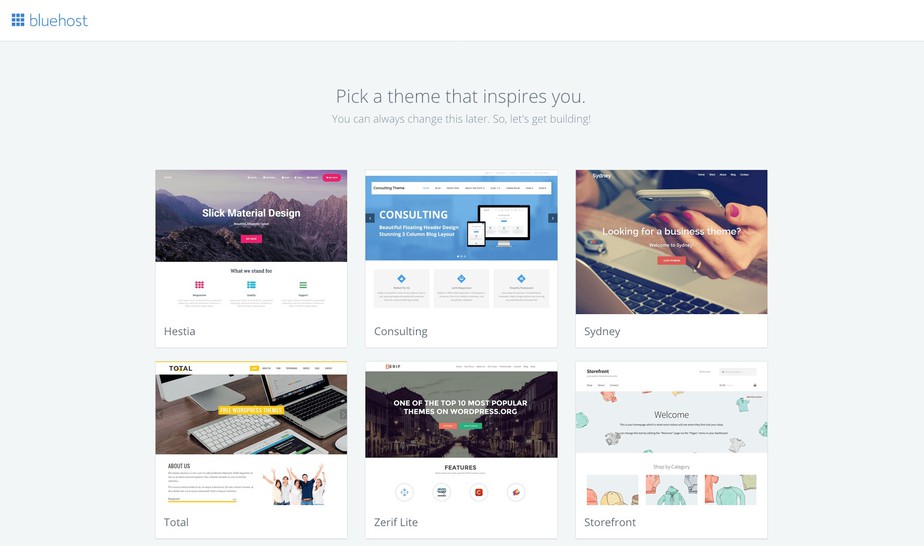
Now you have to log in to your BlueHost hosting account with your login credentials, after login in, BlueHost will show you some free WordPress themes you can choose from, go ahead and skip them because we will be using free themes from Alidropship Archive.
After skipping the free themes, what you will see on your next page is welcome to WordPress with a question tag, “do you need any help?“
Click on. I don’t need any help; they are not the ones helping you; it’s me that’s helping lol!
After declining their offer to help you, you will see a new page in your browser leading to your hosting CPanel, or you can check your E-mail for your CPanel login credentials.
What you need to do is to log in to your hosting account so that you can set up your WordPress account.
Once you’ve logged in, on the left-hand side, select ‘my site’ and follow the simple procedure to set up your WordPress site on your domain name.
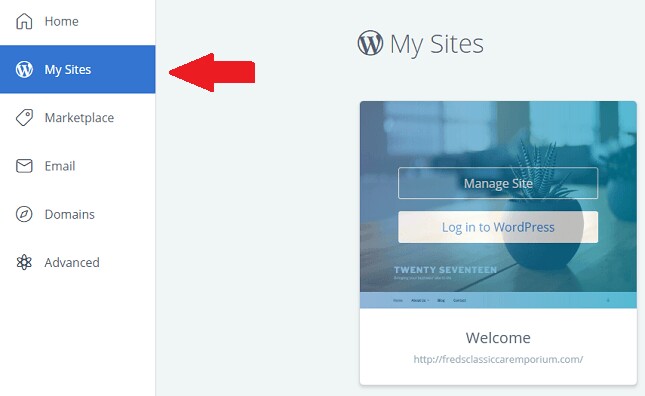
At this point, our WordPress site is functional and can now enable us to create a successful dropshipping website using Alidropship WordPress Plugin.
Create a Dropshipping Website With Alidropship Plugin
If you have gotten to this stage, then just know that you are close to completion. At this stage, we will be discussing the Alidropship Plugin and how to use it to build our dropshipping store.
What is Alidropship Plugin?
AliDropship plugin is a WordPress plugin that turns your website into a dropshipping store that can import products directly from AliExpress.
The plugin has a ton of features which includes:
- Filter and search products on AliExpress and import them to your website in a few clicks
- Get the product info updated automatically
- Quickly and easily set a price markup for your items
- Automatically get in touch with AliExpress sellers to fulfil your clients’ orders
- Track orders and automatically notify your clients about their current status
- Customize your store and make it look unique and memorable
- Get access to an all-in-one dashboard helping you manage the whole thing
- See the live statistics about your store performance
Unlike other E-commerce platforms that charge you monthly fees for their service, Alidropship makes you pay a one-time fee and have access to their unlimited features.
As long as the Alidropship plugin is a WordPress plugin, you don’t need to worry about anything because you have 100% control over your site, You can move your store from one web host to another without losing the contents of your store.
Install Alidropship Plugin
To continue with building our dropshipping website, we need to download and install the Alidropship plugin on our already existing WordPress site.
To install the plugin, head straight to http://www.store-name.com/wp-admin and log in with your WordPress details to continue.
After a successful login, you will land in your WordPress admin dashboard, from there navigate to the Plugins tab, click Add new button, then Upload Plugin, choose a file to upload, and click Install Now.
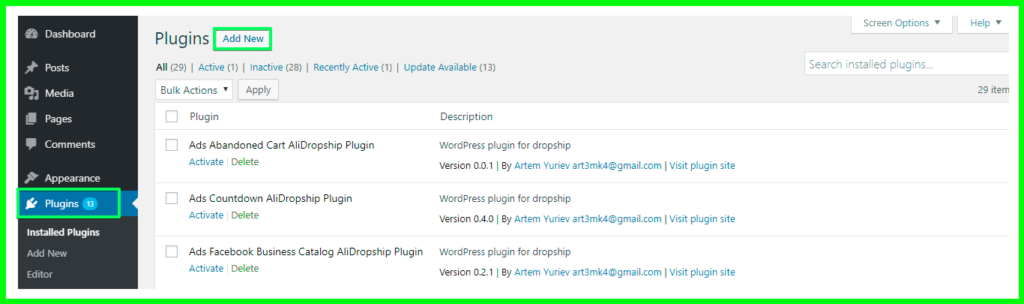
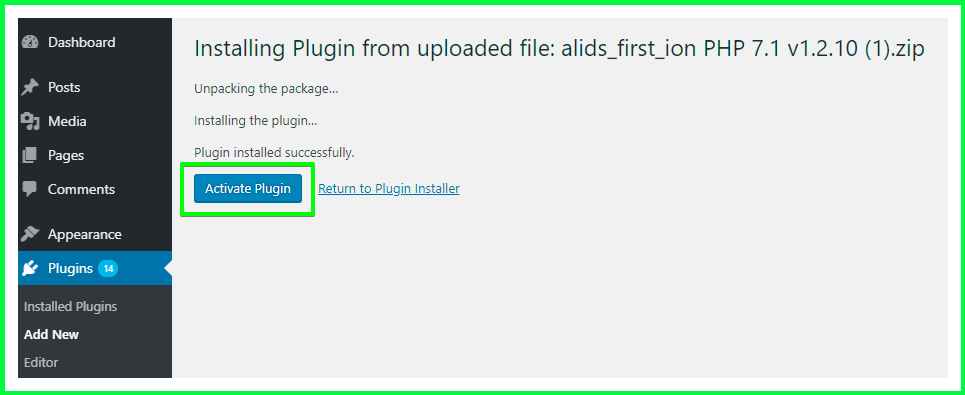
Click on the “Upload Plugin” button at the top section of the website to upload the Alidropship Plugin
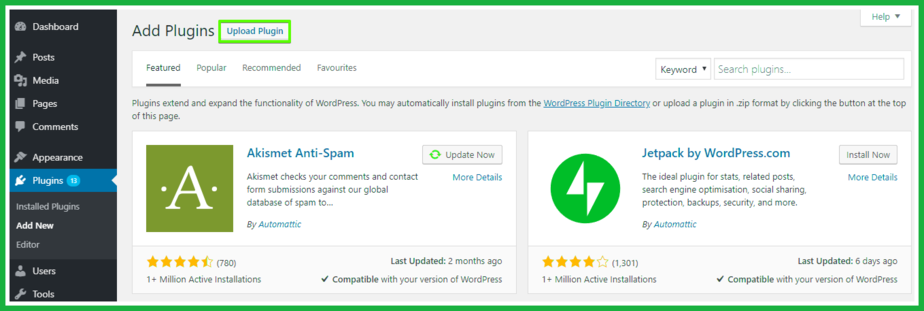
After uploading the plugin, it will automatically get installed, and now you need to activate it by clicking the “Activate Plugin” button highlighted in the image below.
Once the plugin is installed and activated, the next is to go to install a theme for your dropshipping store, AliDropship plugin is only compatible with the built-in items, it does not work with WooCommerce-based themes.
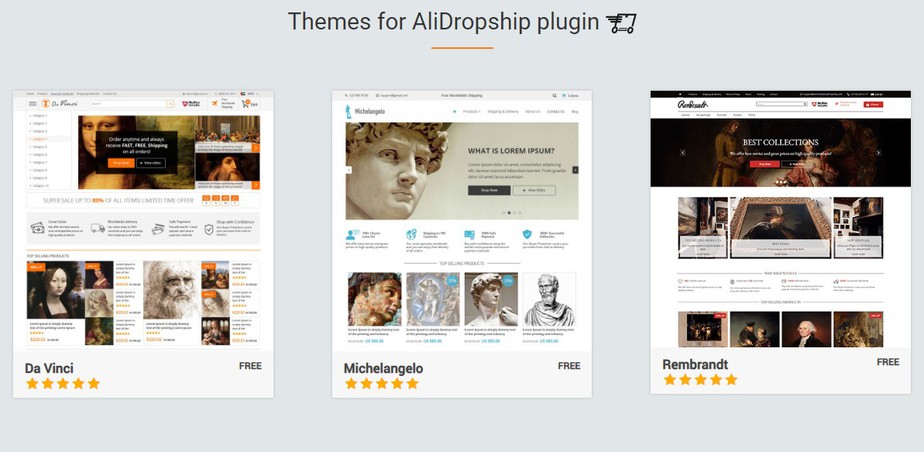
To install the theme on your new dropshipping website, First, you need to go to the Alidropship theme’s archive and select any theme of your choice.
All the themes on their archive are very Ok and can serve for Dropshipping business, so go ahead and download any theme of your choice.
After downloading the theme, upload it to your WordPress site by clicking on Appearance => Themes and Add New theme.
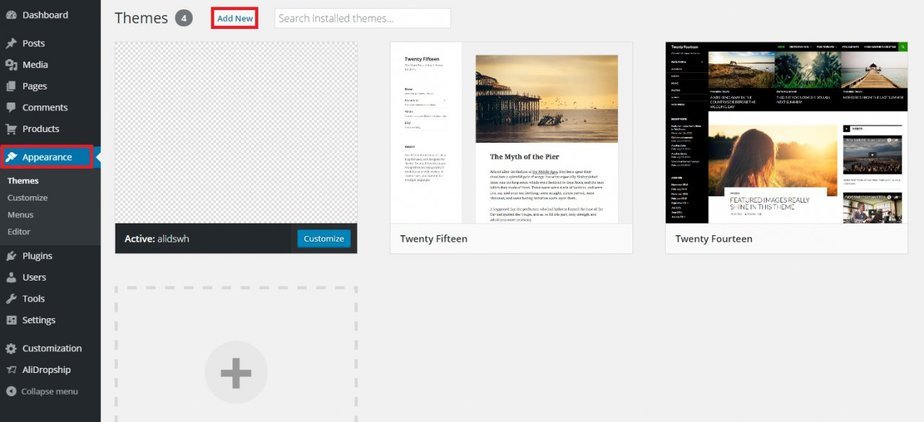
After clicking on the ‘Add New’ button, upload the theme you downloaded, which suppose to be in a zip format, and activate it on the next page.
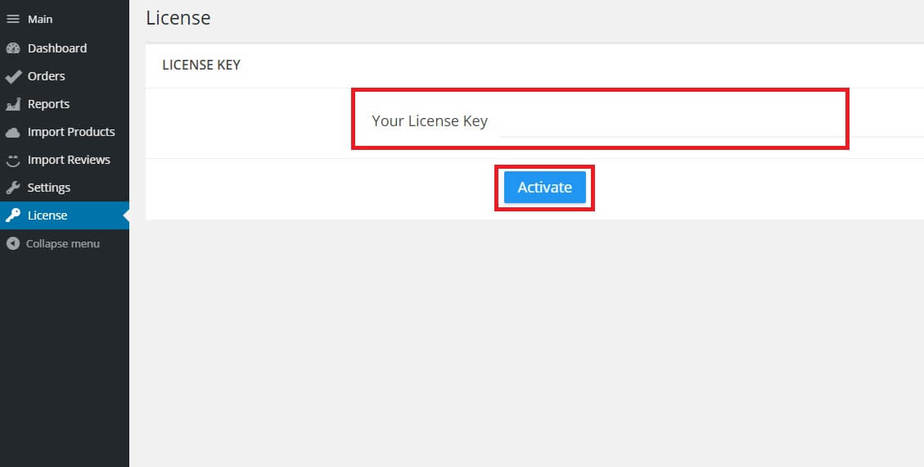
The last thing to do now is to activate the Alidropship plugin with your license key.
To do that, click on the Alidropship from the left-hand sidebar of your WordPress dashboard. Click on “License” and past the key, in the text box, then click “Activate.“
Congratulations on your new dropshipping store; at this junction, you are a full dropshipping site owner.
Note this license key works only for one website; if you want to use it on another website, first you will have to deactivate the key on the current site where it is active.
How To Create a Dropshipping Store With WooCommerce
For the sake of clarity and better understanding, before going deep into details on how to set up a Dropshipping website with WooCommerce and WordPress, I will like to explain the difference between the two.
- WordPress is an online, open-source website creation tool written in PHP. It’s probably the easiest and most powerful blogging and website content management system (CMS) in existence today. While…
- WooCommerce is a free WordPress plugin that adds e-commerce functionality to your WordPress website so you can have an online store. With just a few clicks, your WordPress website turns into a fully-functional e-commerce website.
Now we will see how to create a dropshipping website with WooCommerce and WordPress
Step 1. Install WooCommerce Plugin
The first step is to download and install the WooCommerce plugin, so you can able to use all the benefits of the WooCommerce platform for your dropshipping business.
To download the and install WooCommerce plugin follow the steps below
- Login to your WordPress admin dashboard by going to https://www.domain-name/wp-admin.
- From the sidebar on your left-hand side navigation to Plugins >> Add New.
- On the page, search for WooCommerce in the search form provided.
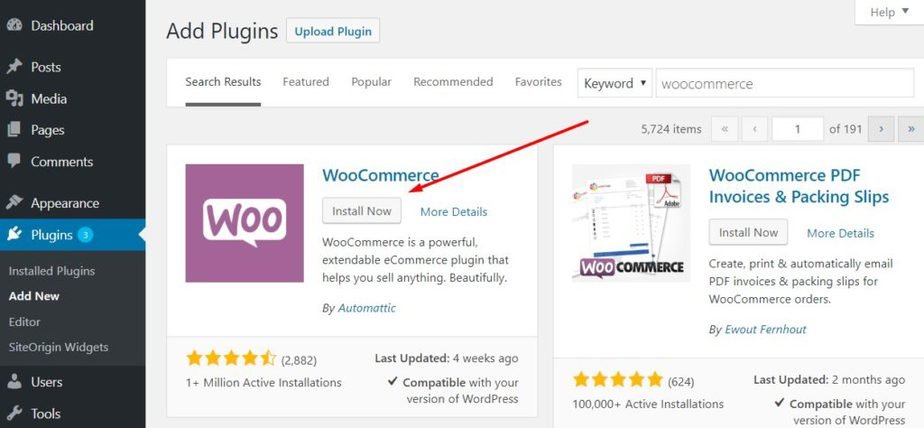
- Install and activate the plugin
- After installation, follow the setup wizard to build your store.
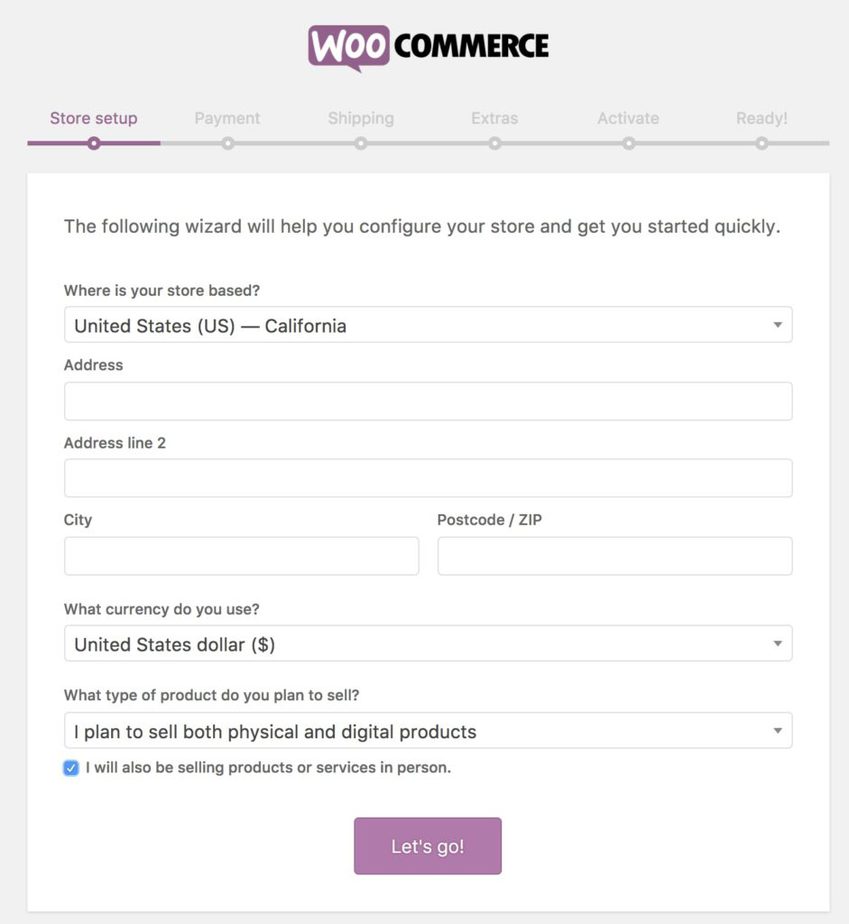
The setup wizard will help you to set up your without any hassles. All you need to do is to follow the steps on the screen.
First Step: Here, you are expected to put your store address and the kind of goods you want to sell in your store. Uncheck the box that says I’ll be selling in person, then click the let’s go button.
Second Step: Here, you will choose a payment method for your store. This payment method is how your store customer will make payment for the goods they purchase from your store.
Third Step: This step is all about the shipping of the purchased goods from your store. Select the unit of measurement for weight and dimension, this is confusing but don’t worry Alidropship WooCommerce version will help you to tidy it up.
Fourth Step: This step is all about your storefront theme and Tax, WooCommerce can automatically install a theme for your storefront and will also help you calculate tax automatically.
Last Step: The final step here is to install and activate a free Jetpack plugin for site enhancement.
You’ve successfully installed the WooCommerce plugin, and your store is almost ready. We will tidy up the whole process by installing the Alidropship plugin for WooCommerce.
Step 2. Installing AliDropship WooCommerce Version
The process of installing Alidropship Woo is very similar to installing the regular WooCommerce plugin.
To install the plugin, follow the steps below…
- From your WordPress Admin dashboard.
- Go to Plugins >> Add New.
- Upload the plugin zip file
- Click “Install Now. “
- Click “activate. “
Once the Alidropship plugin is installed, you can also use the Alidropship themes to build your store.
Simply head over to the AliDropship theme page and download one of the WooCommerce themes. They have both free and paid themes.
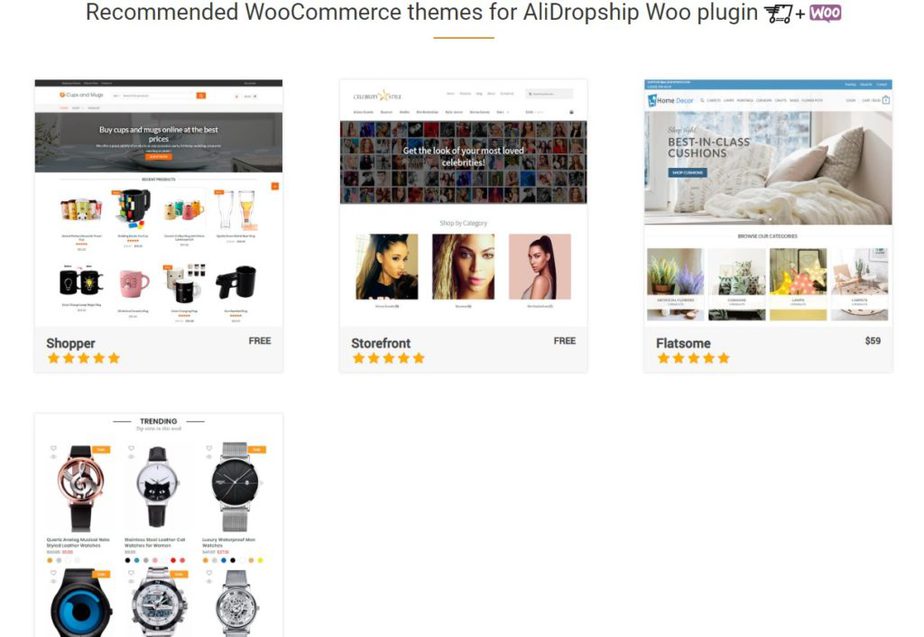
From the normal process above download and activate your desired themes.
You can read this article to learn more about customizing the Wooommerce theme
The next thing is to activate the plugin with the license key, copy the key, and activate it.
How To Import Products From Aliexpress Using Alidropship Plugin
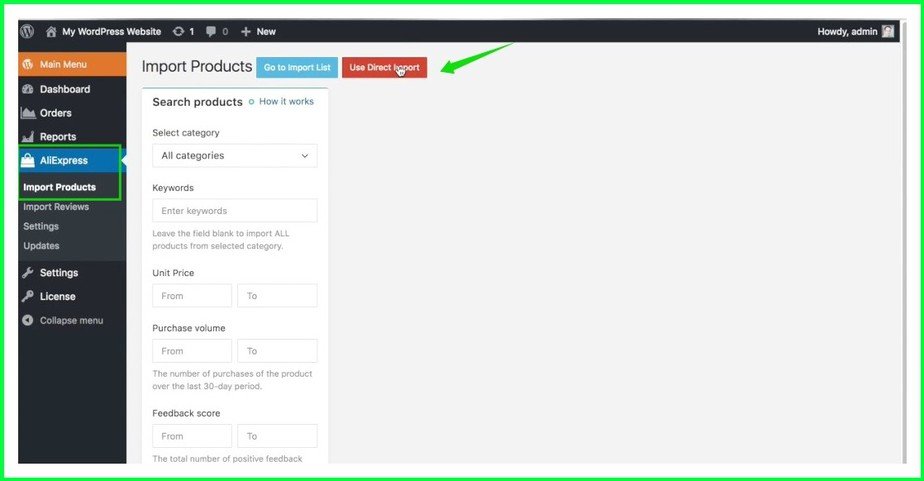
To start importing products to your store from Aliexpress, you have to first install the Alidropship chrome extension with the help of this chrome extension you can do some other things other than importing products such as updating products, collect tracking data and process your order automatically.
After installing the Alidropship chrome extension from your WordPress admin dashboard, go to the Aliexpress import section and click on the “Use the direct import” button on the top.
You will automatically be redirected to the Aliexpress website. Note, it requires that the two tabs must be open while the importation process is going on.
Now that you are on the Alidropship website before you import any product, go to the desired product category, and click on the gear button at the top right-hand side of the website.
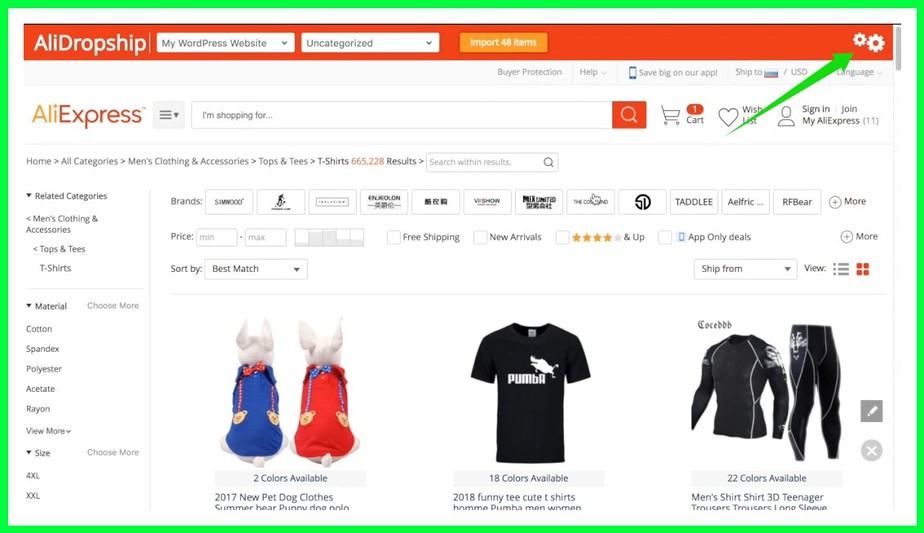
After clicking on the gear button, you can filter the product you want to import either by choosing the shipping country, shipping method or product description type.
Once the products are filtered to your taste, you can start importing them by clicking on the product, once you click on the product you will see an orange-coloured button then click on it to introduce the product one by one.
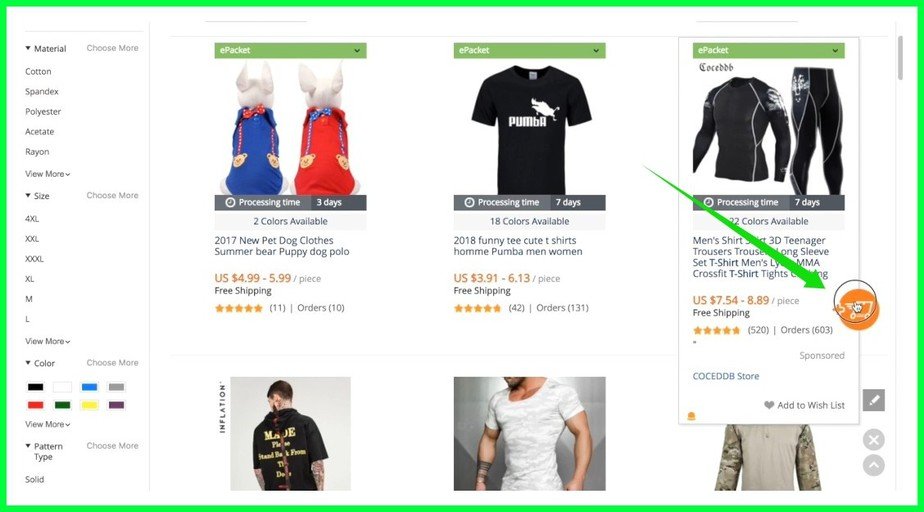
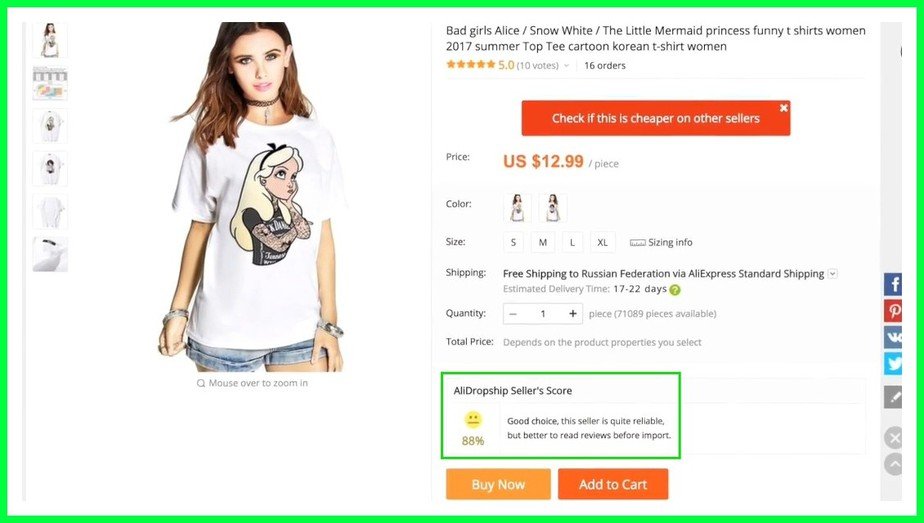
If you wish to import products in bulk, click on the import button available at the top of the website. On the single product page, you will find the Alidropship sellers score. It is advisable to import products higher than a 90% rating.
If you want to edit any product before importing it, click on the edit button at the top of the page and a new window will be popped up with all the product settings that you can change.
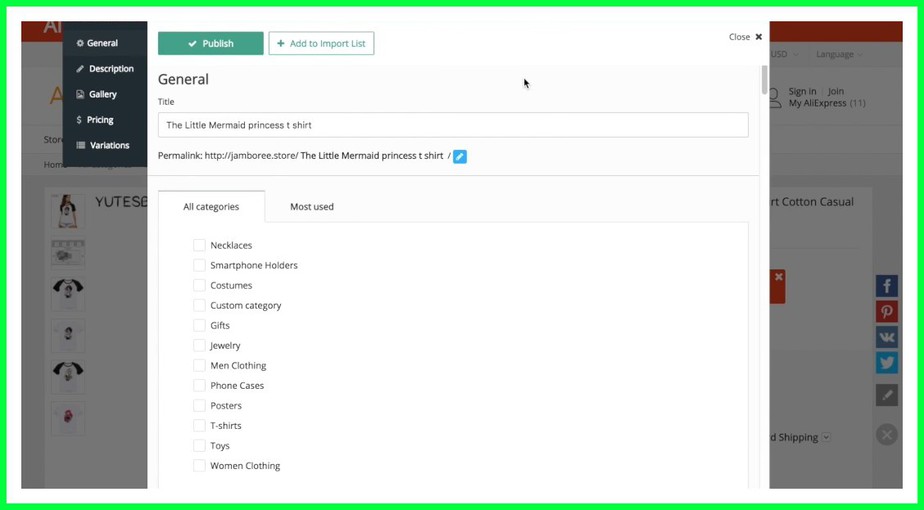
- General Section: Here, you can change the title of the product to your desired title and also change the permalink of the product.
- Description Section: In this section, you can use the description section; you can change the description of the product by writing a new one.
- Gallery Section: This section allows you to make changes to the product images. You can change the image, edit it with the inbuilt image editor that comes with the Alidropship plugin, add a new design, and many more.
- Pricing Section: You can set a new price for the product and set a price variance different from the one on the Aliexpress website.
Once you are done editing the product to your taste, you can decide to publish the product to your store by clicking the “Publish” button on top.
In a case whereby you don’t want to publish the product immediately, click on the “add to import list” button beside the “Publish” button on top for the product to be saved as a draft. This product will not be visible to your store visitors since it is not published.
To publish the product login to your WordPress store, then go to the import list, click on product details, and then hit the print button.
Congratulations, you made it to the end, it’s now clear to you that building a dropshipping website with WordPress is very easy.
Did I try as much as possible to break everything here down? If there is any part, you want me to shed more light on, feel free to drop your question in the comment section below.
Please pin this image below on Pinterest